find me on facebook!
Jennifer Julie Cakes
  • Blog
  • Gallery
    • Cakes
    • Cupcakes
  • About
  • FAQ
  • Contact

Open Season for the Holidays!

11/1/2014

0 Comments

 
As an American, I've always felt like Halloween was the kick-off to the holiday season. Once you get through Halloween, you're off and running to the indulgent joys of Thanksgiving and Christmas. I've had to adjust my perspective a bit living in Canada, with Thanksgiving falling early in October... but that's cool, it's fantastic to have a little early preview of all the goodies to come.

I wanted to make a Halloween cake this year that wasn't too labor-intensive, since holidays with a 3 and 5 year old - while fun - are still quite a bit of work, getting them prepared, dressed, fed, partied, rested, etc. This spooky yet sweet mummy fit the bill. He even has lavender eyes to keep him fun and friendly, perfect for a 3 year old who continues to be terrified of everything that moves.
Picture
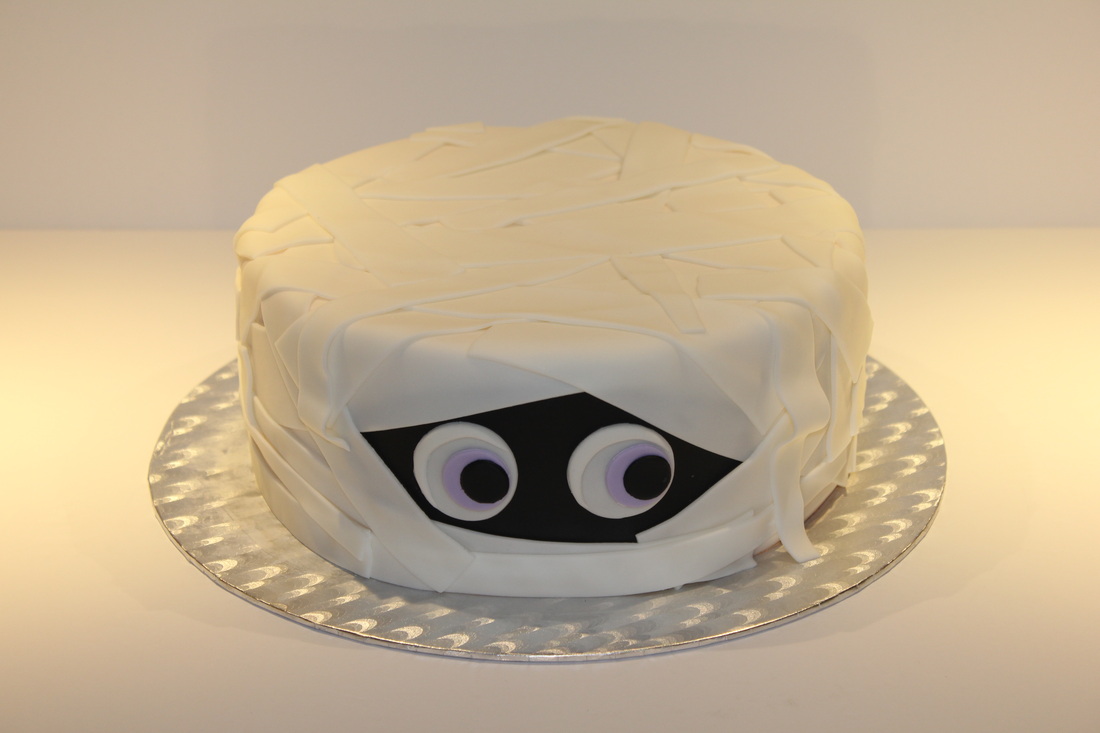
I covered a 3-layer, 9-inch round chocolate cake with white fondant, and then cut out an oblong piece of black fondant, to which I affixed (with water) simple circular eyes, also cut out of fondant. After I applied that to the side of the cake, I rolled out long, thin strips of fondant that I cut somewhat haphazardly with a pizza cutter into strips that were anywhere from 3/4" to 1 1/2" wide, and anywhere from 4" to 10" long. I started out by framing the eyes, and then rather randomly laid on the strips (affixing with water) till it was covered. Easy breezy cheddar cheesy.

In a complete non sequitur, I had a request last week for a Scottish tartan cake. It was for a friend of a friend's mom's 70th birthday. She had no specific tartan preference since they descend from "a mishmash of clans". So she left the color and pattern up to me.

Not having any tartan training, I turned to The Great Internets. For the first time ever, The Internets failed me. I found no good tartan cake examples to steal. Er, borrow. The majority of the tartan cakes I found had either a plaid ribbon wrapped around them or a plaid edible image applied to them. Neither of these was particularly up my alley, so I dared to venture out on my own.

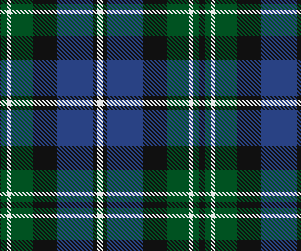
My Google search of Scottish Tartans revealed this one, which just happened to have the fewest colors of all:
Picture
After testing how to layer on the strips without involving excessive basket weaving techniques (using strips of leftover fabric from my sewing box), I rolled and cut out long, thin strips of fondant (maybe this wasn't a complete non sequitur after all) and laid them on my white fondant-covered vanilla cake.
Picture
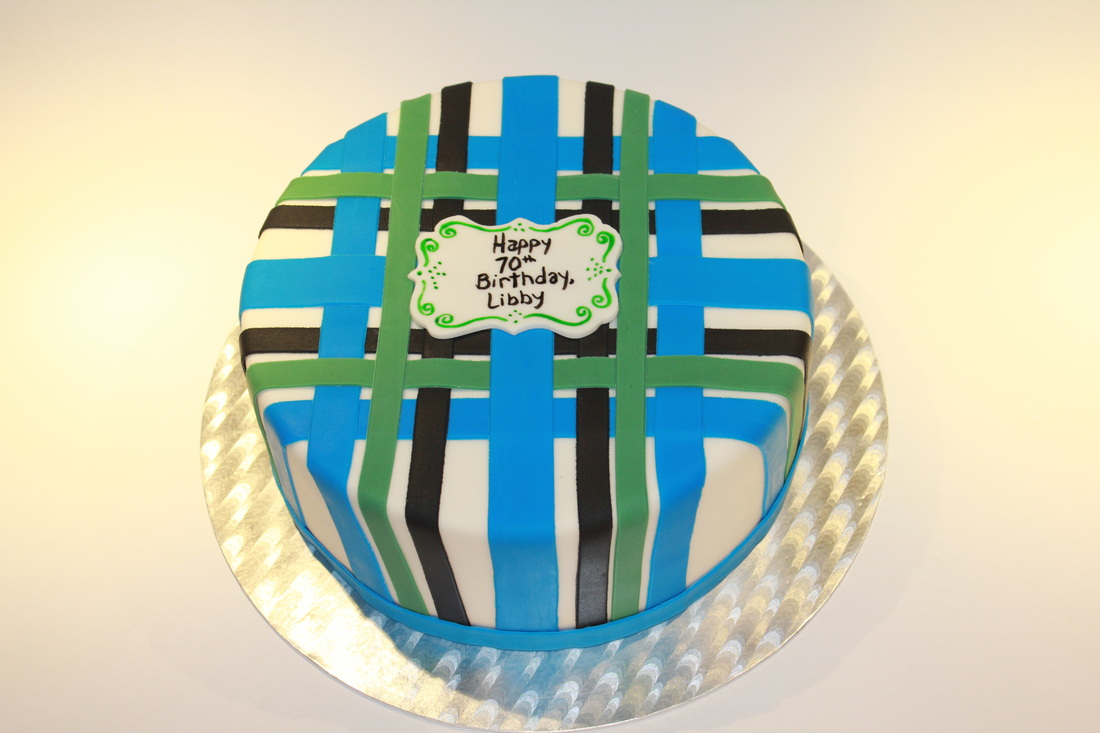
Granted, it's not an exact tartan replica of any recognizable Scottish clan, but still, I'm really happy with how it turned out.

Happy 70th birthday, Libby!!

And now, without further ado, let's get these holidays started and laissez les bons temps rouler!
0 Comments

Replicating a Detailed Logo on a Cake

6/9/2014

2 Comments

 
Andrew volunteered me to make a cake for his rowing club's annual summer potluck BBQ this weekend.  Of course I was happy to do it, but I wasn't so sure about recreating the club's rather detailed crest on a cake.
Picture
There are a couple of ways to do this that I know of, and would of course love to hear other ways you have used with success. 

One option is to invest a few hundred bucks in a Kopykake like the pros and serious hobbyists do, but I definitely don't have the scale of business to allow for that in my (non-existent) budget.  Cool, but totally unrealistic.

Another way would be to print the image out on edible paper and transfer it to the cake.  However, my biggest cake fail to date involved an edible paper transfer at midnight the night before a cake was due, so I am extremely gun-shy of the stuff.

You could do a frozen buttercream transfer, which is the back-up method I used after my spectacular edible paper fail, but I don't find my piping hand to be quite steady enough for the detail required for this emblem.

So the next best thing I have come up with is a simple yet effective tracing method.

First, you need to print out your logo or emblem in the right size.  I did a bit of trial-and-error by tracing my baking pan onto paper, and printing the logo a couple of times to find the right size.

I placed my logo cutout onto a paper strip approximately the size of a blue fondant stripe I would eventually put on the cake to mimic the stripe on the Don Rowing Club's oars, just to make sure the size was right, relative to the cake.
Picture
Next step was to knead a tiny bit of tylose powder into a small bit of white fondant, in order to give my fondant circle a bit of hardening power when it dried.  This would make it easier to pick up and place it on the cake, and it also hardened up the fondant just a bit, immediately, which allowed it to resist the pressure of my hand holding down the paper cut-out.  

I would estimate this is maybe 1/4 teaspoon of tylose powder to an ounce or so of fondant.  (This is what I do instead of buying or making large amounts of gumpaste that I don't frequently have a use for.)
Picture
Roll out fondant to 1/8-inch thick and cut out your shape.  A circle in this case.  (10 points to anyone who noticed I should have used the purple rolling pin circles instead of the pink ones to get the right thickness.)
Picture
Then place your emblem/logo/crest/whatever paper cutout onto your fondant shape and use a thin yet dull tool to trace the entire thing, thereby making a slight indentation of your image into your fondant.  I used the skinniest tool from my marzipan tool set.  I have never used these tools for marzipan.
Picture
Picture
I'm not left handed, but I seem to be better at faking drawing with my left hand than actually taking a picture with my left hand.
Picture
Carefully remove the paper from your fondant - carefully, because you might find it sticks a bit - and assuming you traced the whole thing carefully, you will have something similar to this.  Look closely and you can see the slight indentation of the crest.  (I forgot to take pictures of the rest of the process AGAIN so these next two pictures are a sloppy re-enactment.) 
Picture
The only thing left to do is trace the indented emblem with your Americolor food coloring marker.  Seems easy enough, but this is where the going gets tough and you will test your nerve, because there is no eraser on a food coloring marker.  You need a steady hand, and possibly some extra patience if you need to start again from scratch if you make a mistake.  Which I did.  Twice.
Picture
This one turned out pretty well, except for the fact that I inverted the order of a couple of the words.  "Don" belongs on the left side Jen, not on the top.  D'oh.  So I started over.
Picture
Third time's a charm, and here is the finished cake.
Picture
I also used this little trick a couple of weeks ago on a bridal shower cake.  The mother of one of the brides sent me a photo of the logo the couple were using on their invitations:
Picture
I used the same method, and cut out tiny colored fondant triangles to color in the dresses.
Picture
I'll be the first to admit that these are not 100% perfect, photostatic renderings of the originals, but I think this method does the job nicely.  And it fits my budget!
2 Comments

    I'm Jen

    Baker and caker, mom and wife, ex-pat from the corporate world, I love turning butter and sugar into memory-making cakes.

    Archives

    February 2015
    December 2014
    November 2014
    October 2014
    September 2014
    August 2014
    July 2014
    June 2014
    May 2014
    April 2014
    March 2014

    Categories

    All
    Animals
    Baby Shower
    Baptism
    Barbie
    Barnyard
    Birthday
    Brave
    Buttercream
    Chocolate
    Crest
    Cupcakes
    Disney
    Emblem
    Fairies
    Flowers
    Fondant
    Food Coloring Marker
    Frozen
    Gluten Free
    Golf
    Kids
    Layer Cakes
    Logo
    Modeling Chocolate
    Poker
    Rapunzel
    Recipes
    Sculpted Cakes
    Silhouettes
    Wedding

    RSS Feed